Configuring SSO with SAML
Last updated 29/02/2024
Working with SAML
If you have not added an Authentication record before, please refer to the introduction on Authentications to have an understanding of the fields on the Authentications form.With an authentication type of SAML, the following fields will be shown:
- Entity ID
- Identity Scope ID
- Identity Scope Name
- Identity Scope Email
- Metadata URL
- Private Key Pass Phrase
- Private Key
- Certificate
The Entity ID value is the entity identification that has been registered with the application provider.
Example- spn:71ba88b9-c6eb-4cb8-94d8-4a80299a0549
The Identity Scope ID value is the name of the ID attribute. Refer to your provider for more information.
Examples- objectidentifier
http://schemas.microsoft.com/identity/claims/objectidentifier
The Identity Scope Name value is the name of the Name attribute. Refer to your provider for more information.
Examples- displayName
http://schemas.microsoft.com/identity/claims/displayName
The Identity Scope Email value is the name of the Email attribute. Refer to your provider for more information.
Exampleshttp://schemas.microsoft.com/identity/claims/emailaddress
The Metadata URL value is the provider's endpoint for the Federation Metadata document.
Examplehttps://login.microsoftonline.com/c1cdf3d1-5e78-4a7b-94a0-924f9b9a7800/federationmetadata/2007-06/federationmetadata.xml
The Private Key Pass Phrase value is the password to encrypt an automatically generated Private Key, from which a generated Certificate will be created as well. If this field is left blank, the Private Key and Certificate field values need to be provided manually.
Example- TestPassPhrase
The Private Key is the value to use during the SAML authentication process. The value should be a PEM encoded RSA Private Key.
Example-----BEGIN RSA PRIVATE KEY-----
Proc-Type: 4,ENCRYPTED
DEK-Info: AES-128-CBC,b8e7f85a79cc630b49ac4aeeac63ab1b
S6lGf/Idj2ZoqhsssFWXp7kXzhbrbsCYYq3wgK4bx2tQdKCvzld9AptSoQaXeevQ
SA92NkmnGxrj6TKSekWN4iwHR2AkGh9uAzilZ9MOWDxNWrH0GatCJbucEd0/TuG2
nDpF4xmiN5+zU5xslKhggUgrJ0qiuwcNArgamIXxni143sQMyieuAmg58j2X3cHX
cn7zaOl3geUiI6q1vDR80Rwaojv84o3OdAKYnjeJ6qWEn11yMh7Do6RPgEvq7RJ9
t3ZC0t1WCxOFE8eacxbbHUFbTA3giZucFk1kBnpZW03czzl7153YrDrJ6W1n9+P9
ttGqTCYetGJfVJBURQDlt4p3eBptWd91EJUB5VIvvWAq5yoX7VOTqOx+iL/Sf1AI
pseI9jxigTIGCBCyAS+SgZzac0C5//9lL6sOPrmVrrQE6CfEdboOGdj/C9++joFV
q9cIFSgCPuMQtzsqLrgJS3sxullulY4xsF/NDuG977IUYnvuO4FgWBtoeIbmF0LK
lviJIjY6N6givOyBljCpsrBp/SPhU8MeN2u5XG9gItYrhE6x+3nmXa/B7LhRXvTo
D72jcNdBA+fmPP0k5jx1Dgak7NOMt4TFkdOG6l7kqO3jLFykcrDOKvxZIrSAQCmo
6xgDpLpj94etF6KYHJejSJq+dVg9dAipPbeNCgiQqOeqokOeiAVplL0iEe+vCXg/
j7GeT7qJNjn0Hup1Dy7v9vJ3I45hvhmyJQ5uPjamN3sDhKemKxSPQHNqL9eyLE6i
1JIu0QnToAlamkicjy/EmIWoa1aHMv5MPhng+mohyh5Q+PdMvPe/8NZRXhFrybf3
MAKsHmmEBJkXqXrc5g5hs0c/EBFN/PlBtyBEQJgjMvb/ov+1dqQNpC0ZPHVWi1LJ
g2nioy8t6IPGZup6cMjj0k7XsggvcfcoJUy3C7UQelGgz2hoMJy3VrhX8wT9GhGq
T6CGjZLOduQpHlPODMXzdoT+Ek7kE/P9oKWMsg8ZfZlDwx/uOsMgpzrfMyC5LC4N
8PwFW4aKZ2zbgmvAfmIPlgFi47U+Nzf1COM+5LRmUWc4kUi1n4gcvxaynHuKxpHe
CCcihvxylMHPzMTqFIFMnR2fjU28azz3GyxFVsWA6Ms+29Lq/x9N9LOWJfDlk2VD
RXg/3HML9hRkY8pnOY1erNutyS1X6cmZyfF/hB8k7gAL2i2wyStTt6BXj7B5rRc4
DUiIRO6jtW/PzrFGa2AfoPObAGhFR6+0jwigj2JYwpCfk3by1EsJwoHbYgQbYDTn
Q18uAScJxtZzLsnAFVVJWEkdCqMl2ohRy1My9i4ca7b8wTSI+intRVl6TmMmq6VQ
oNkakoafSaCvWm7F0PEo/u4QtSwUoyxXt3gpPpJDScDp8jY2vhserHL7EK19OtfS
j+4p1hD/B1ooCOYs1D4B/2obbtptuC4fJMqSzl1cQEPyINKX5Qs3y5L+JRyC+JwN
RiSOOIx/M/4Y3s5yJjObYMkbk26yBfkYsit3aSloA4+7is64953yn12rvaPxILln
v0RI3GXKU9DmixeCs9q0Djo2YKcHaX4xSls0lPiKWM9ogfZ+Bl5FAlT2zBwn5Sv5
-----END RSA PRIVATE KEY-----
The Certificate is the value generated from the associated private key to use during the SAML authentication process. The value should be a PEM encoded CERTIFICATE.
Example-----BEGIN CERTIFICATE-----
MIIC8zCCAdugAwIBAgIQBXITqViWlunsKJdEf7IYgzANBgkqhkiG9w0BAQsFADAa
MRgwFgYDVQQDEw9TQU1MQXV0aFNlcnZpY2UwHhcNMjQwMjEzMDYzNzU0WhcNMjUw
MjEyMDYzNzU0WjAaMRgwFgYDVQQDEw9TQU1MQXV0aFNlcnZpY2UwggEiMA0GCSqG
SIb3DQEBAQUAA4IBDwAwggEKAoIBAQDJY2jzyX1mCGUUo/+rg/elQsJ+7Y2aJfwr
DBSGxuO83Ir6e1Da332L2D9uVhKJtzqedzJB20jJE8CSoQvTy+SIOcXJTDwPe7wZ
s8rT/Nv4v9rBAa9jJ/RSOw4yDtQ50OjAsnmslN/RdKnING13z89NWwUc7opm4BNx
a5mbukTp23VB1jqG3PteOkaMsvqpEgUV6COQ+sNvUbY3rj4IGVidrZPjNL7AoJ7+
LsBbWsyLi1NcNE/QE1Ywhcuv26OvYRVx6/W5HAEb3v37e27lBjrOoHKam4Z3M0Xz
32Eh6E5HfFFDppkG7dZ7nLHzqulDDgdGZiu6E06kGcnr31DViAwhAgMBAAGjNTAz
MA4GA1UdDwEB/wQEAwIHgDATBgNVHSUEDDAKBggrBgEFBQcDATAMBgNVHRMBAf8E
AjAAMA0GCSqGSIb3DQEBCwUAA4IBAQA5TVc0w+OHEP1HgXZ9FDYUxSOjzEmGdd+I
AR7SazbT87syLv/IgIBzd8RWZ/0RFb0RbfVStKboyU2z7AFUre0Rkdx7ALdpIELL
tXgoMg1TKPneNZSzMV16jEkbCla4LXo8LZm8zpQr9vdbSvqOetcXVJ2NDmtqN5uY
toI/im5Cz8HLikCrY4+v/RktF2NUUUlt2V+wyS/nxcGal4L/ly9LS/2wxUV2TfSd
WA4f4dRefrhjcPim4XPsHxw0D+Q/pDj7CmtqCkAvNmyZZabHA3pXW/y1HBW+UMCp
wobZjbTfazW1REW3RN1qdzMssB2JSzPQ6lipApc2qvaUoEX0NnKf
-----END CERTIFICATE-----
Add an Authentication Using SAML
1. Click the Add Item button.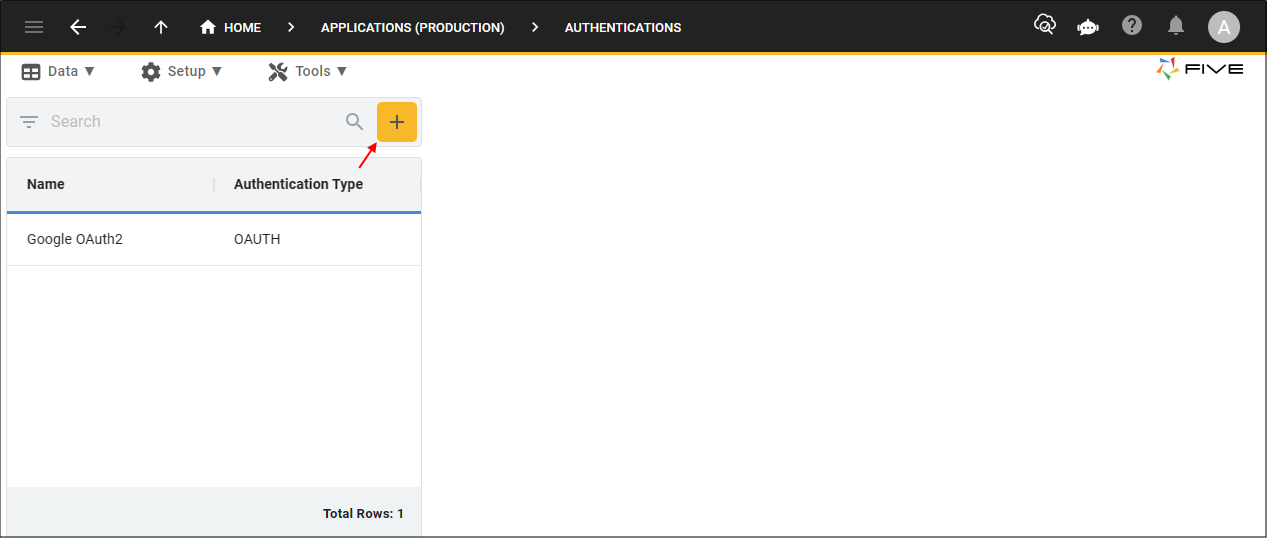
2. Type a name in the Name field.
3. Optional: Click the lookup icon in the Icon field, navigate your files and open an image file.
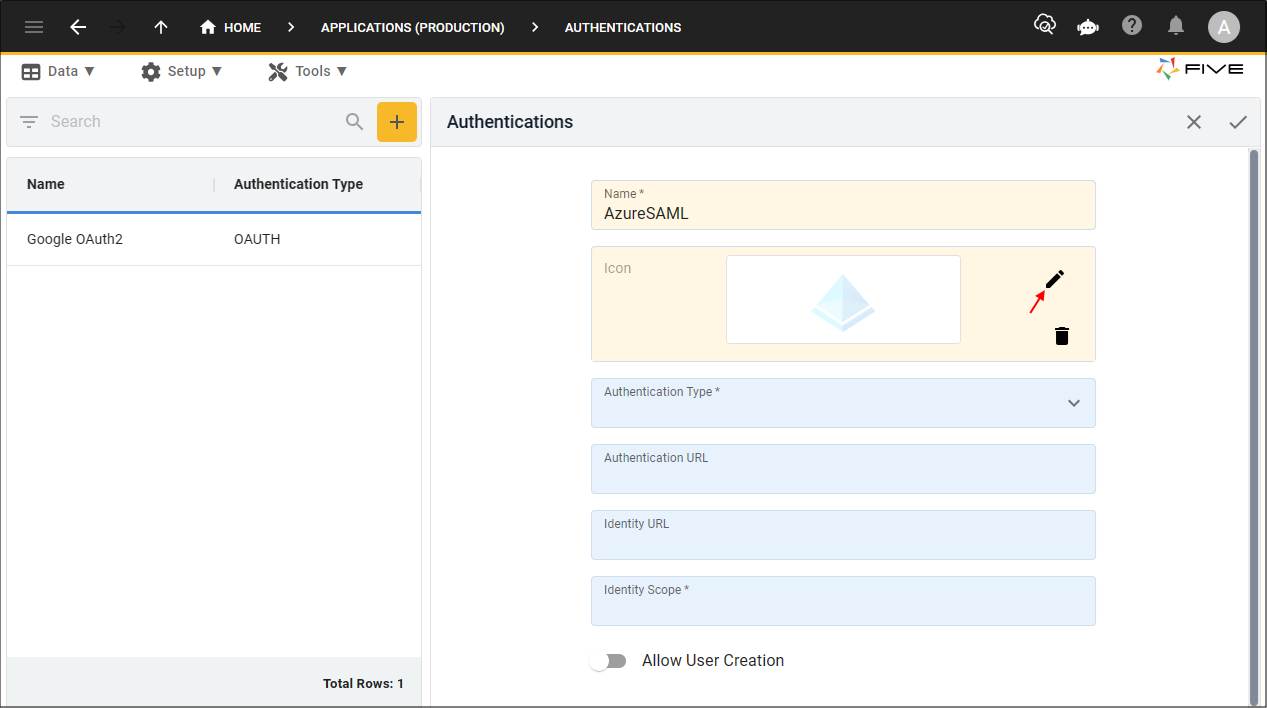
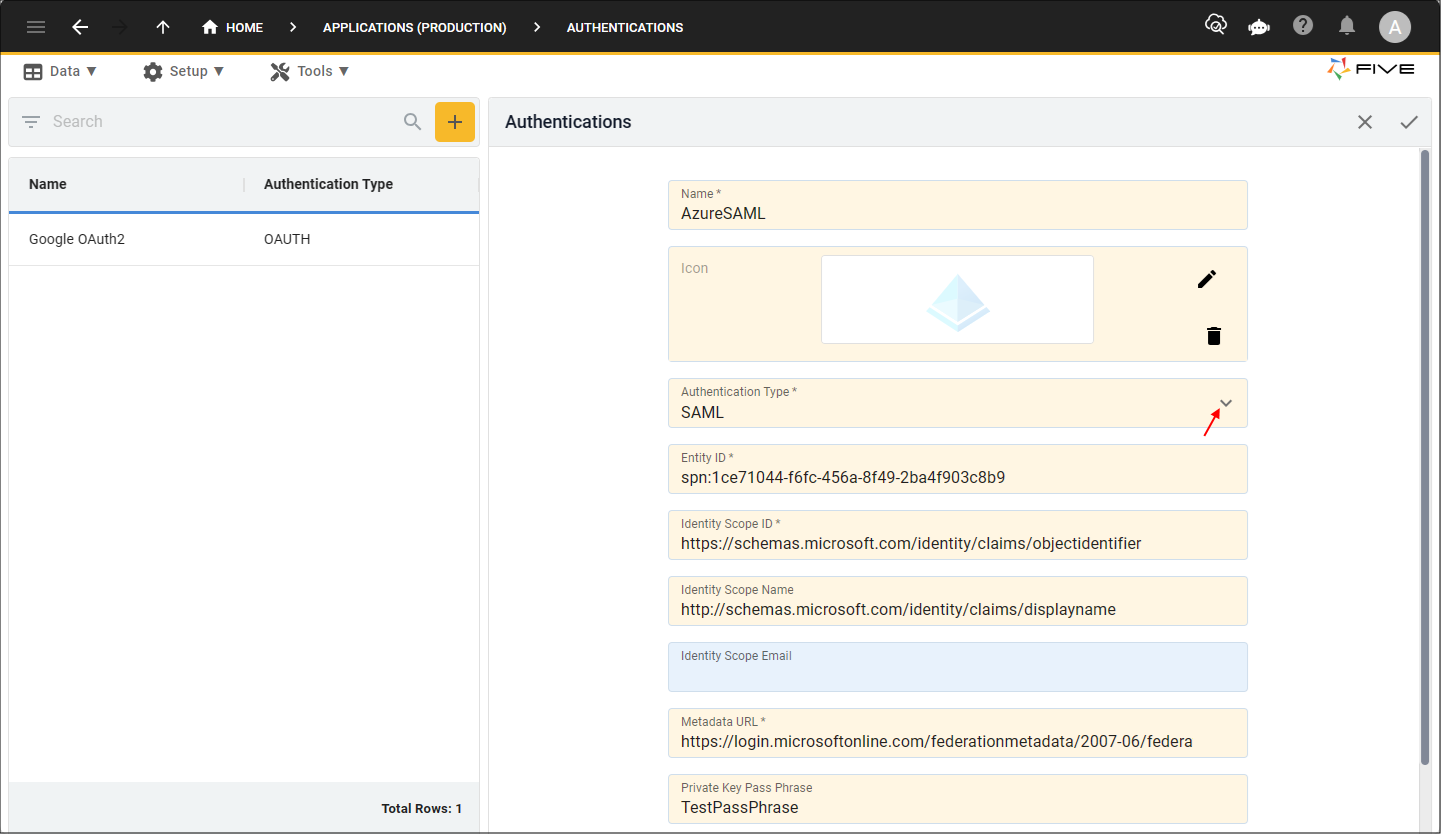
4. Click the lookup icon in the Authentication Type field and select SAML.
5. Type your Entity identification in the Entity ID field.
6. Type the field name for the ID that will be returned about the user in the Identity Scope ID field.
7. Optional: Type the field name for the name that will be returned about the user in the Identity Scope Name field.
8. Optional: Type the field name for the email that will be returned about the user in the Identity Scope Email field.
9. Type the provider's endpoint for the Federation Metadata document in the Metadata URL field.
10. Optional: Type a password to encrypt the Private Key that will be generated by Five for SAML use.
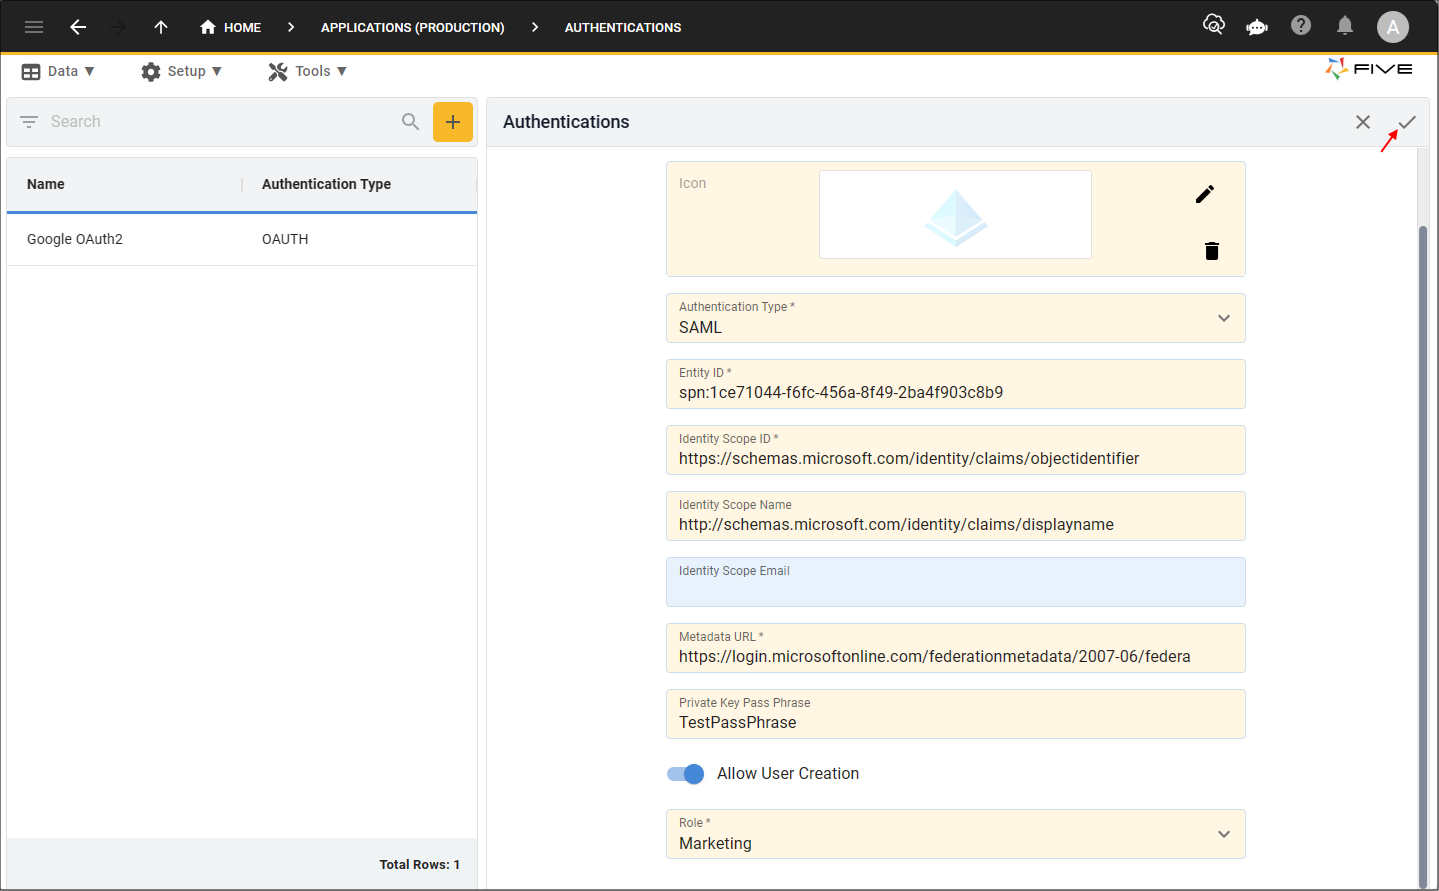
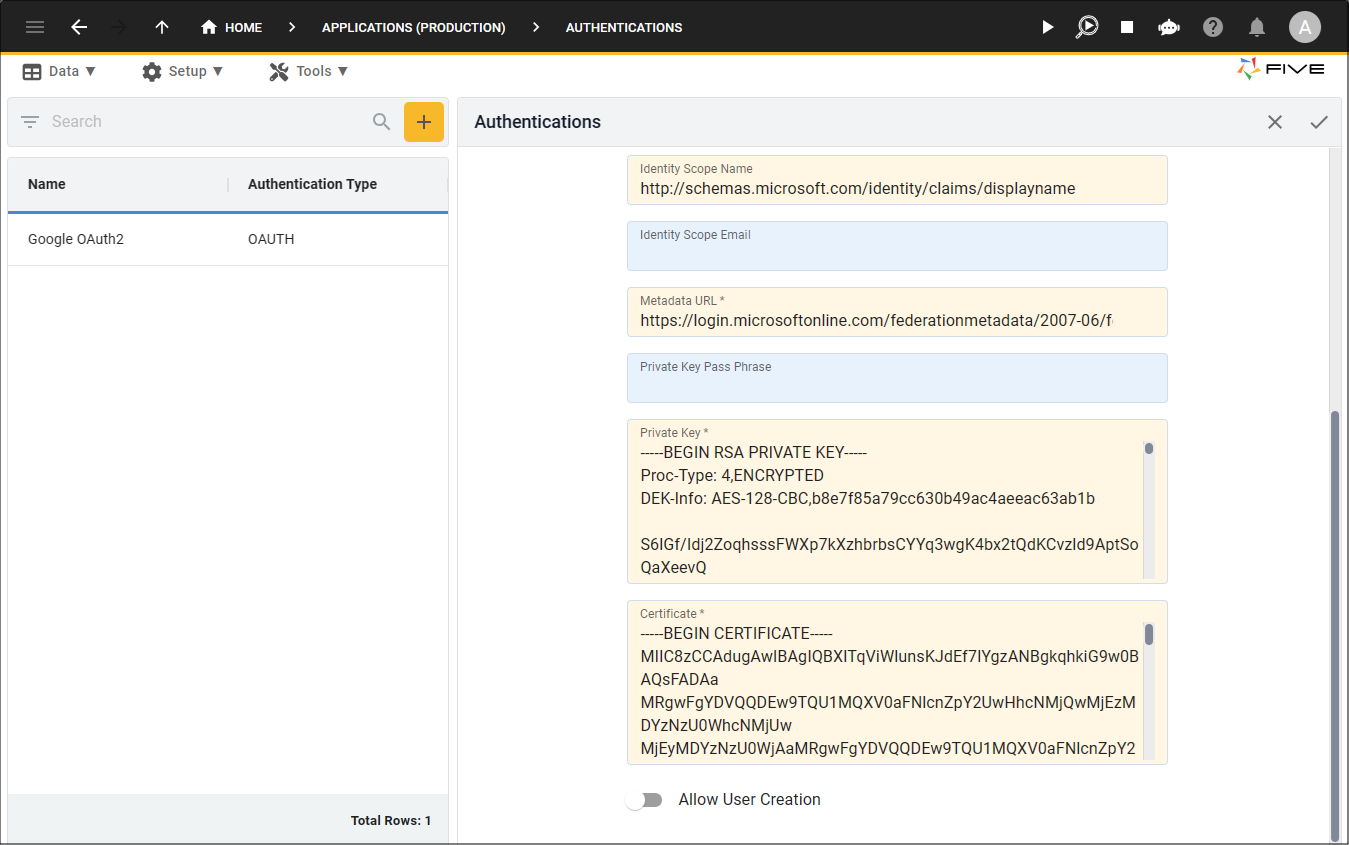
If you do not provide a value in the Private Key Pass Phrase field, you will need to generate a Private Key and Certificate in the PEM format and paste the values in the corresponding fields, as shown in the image below.
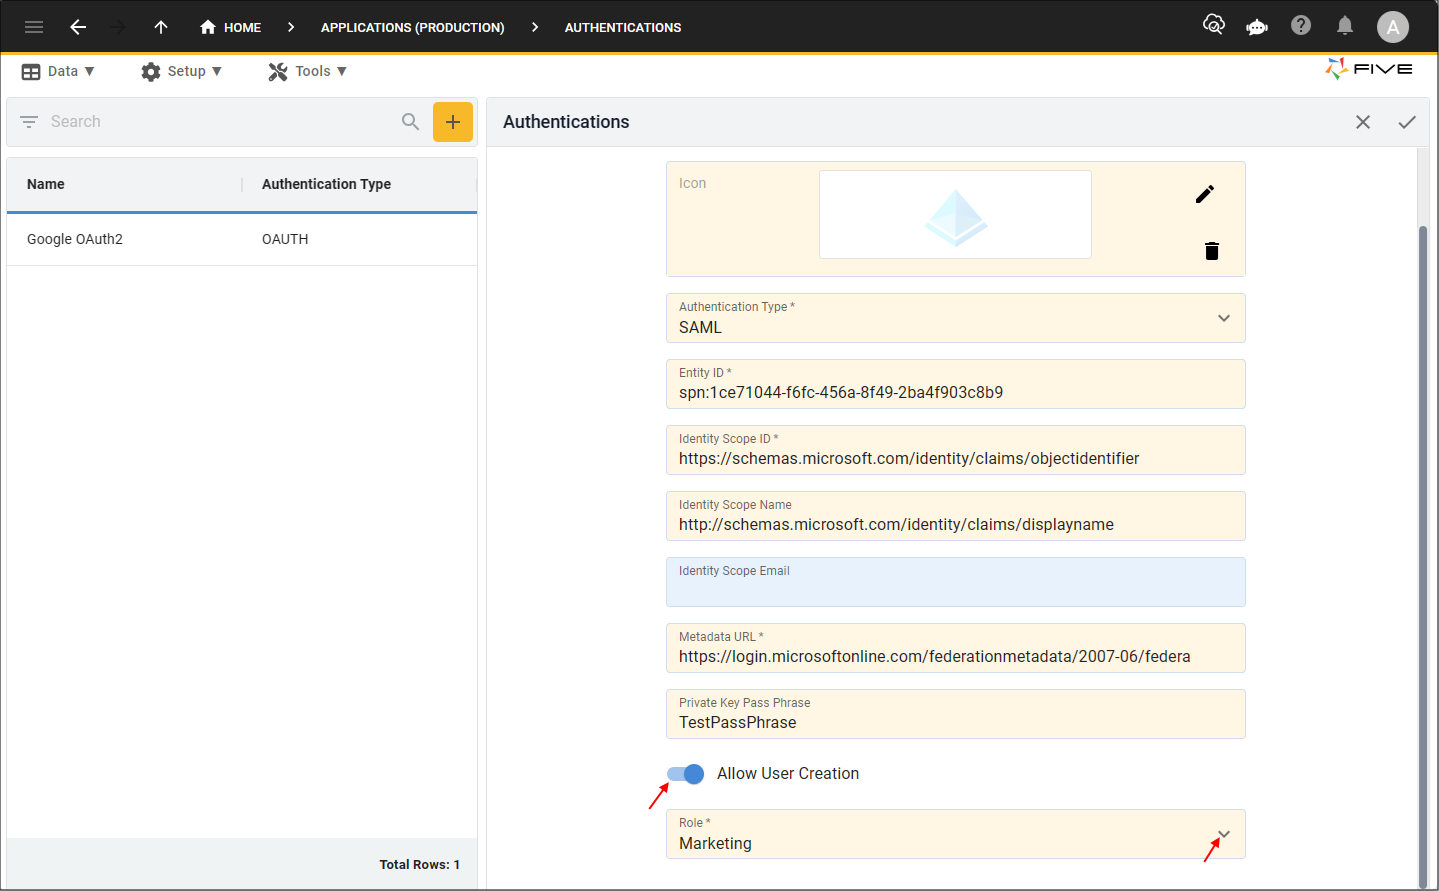
11. Optional: Click the Allow User Creation switch.
If you have the Allow User Creation switched to false, you will need to ensure the user exists in your application before the provider can verify the user, otherwise if the switch is true, the provider can verify the user for you and if the user does not already exist in your application, they will be created automatically.
12. Click the lookup icon in the Role field and select the role you want the users to be created with.
- You will need to have the Application View switch turned on in the Roles form for the role to be available in the Role field!
- The Role field is only available when the Allow User Creation switch is on. If the switch is off the user will need to be created manually in your application.
13. Click the Save button in the form app bar.